Testing the Dedicated Server
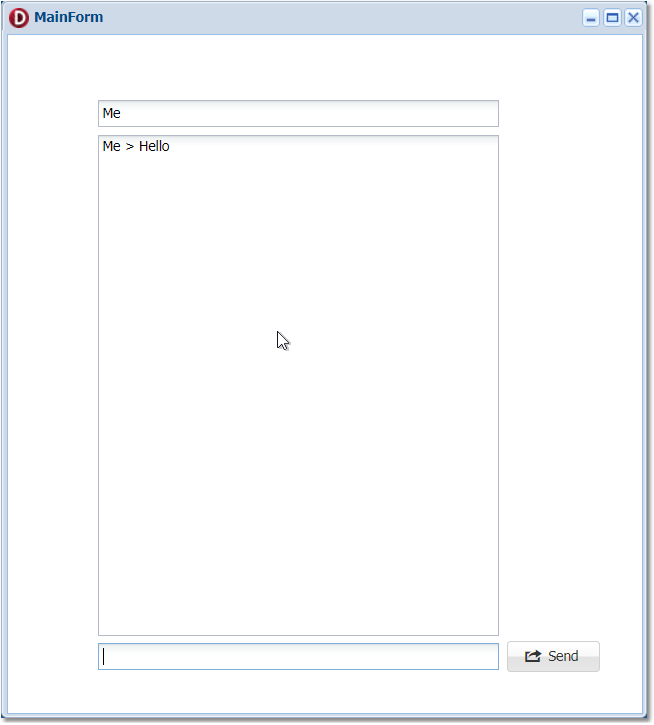
Testing our dedicated server is quite easy. We can take any of the uniGUI WebSockets demos and use it to test the dedicated server. For instance we can use the WebSocket - Basic Chat demo for this purpose.
We copy the demo project to a different folder and open it in the Delphi IDE. We will try deploying using two different methods: first without using HyperServer and then with HyperServer. This will help to clarify the configuration differences between these two different modes.
Normal Deployment (Without HyperServer)
Below instructions are the same for all deployment modes including Standalone Server, Windows/Linux Service, Apache Module or ISAPI Module.
In the picture above you can see the WebSocketServer class property. In this class there are two properties named ExternalServerUrl and ExternalServerToken. We need to configure these two properties first.
ExternalServerUrl
This property determines the URL which the dedicated server will accept broadcast message commands from other applications. When a web application wants to broadcast a message and there is a dedicated WebSockets server, it must relay its requests to the dedicated WebSockets server. The dedicated server will broadcast this message to all available WebSocket clients.
This URL can be a global URL or a local URL which is accessible in your LAN. For example, if your dedicated WebSockets server and your application run in the same physical server under the same operating system you can use http://localhost: syntax for this URL, where is the port number where your server listens to non-secure requests. In our example 8077 is the non-secure port. So we can use:
http://localhost:8077
Here are other possible values for ExternalServerUrl:
http://localhost:8077
http://socket.fmsoft.net:8077
https://socket.fmsoft.net:8078
It must be taken into account that if HTTPS is the only enabled protocol in your dedicated server then there can be only one valid value for ExternalServerUrl which is https://:. For obvious reasons SSL certificates can only be issued for domains, not IP addresses, so a valid certificate can be available along with a domain name only. That's why you need to use a domain name in your URL when you want to establish a secure connection to a server.
Since https protocol can also be used, you need to copy required SSL DLL files into your application folder. These files are required for OpenSSL protocol when an outbound connection is established to the dedicated WebSockets server. These files are deployed with the uniGUI installer and are available under ..\Framework\uniGUI\SSL folder.
Our test application will run on a non-secure port and on the same PC as our dedicated server so we can assign http://localhost:8077 to this property.
ExternalServerToken
This is a unique string automatically generated by a HyperServer instance when you run it for the first time. This value is stored in the related CFG file. You can edit the CFG file and assign a custom token string.
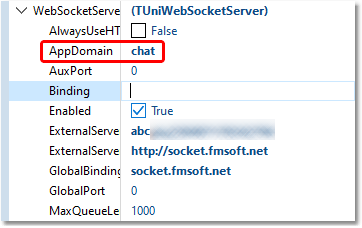
AppDomain
This is an optional parameter which is used to assign a separate domain to each application if the same application is deployed more than once and all of them are connected to the same dedicated WebSockets server. In this example we can leave it blank. If you are going to assign a value it must be a unique value which means the same value should not be used multiple times for different application domains.
So what is an application domain?
An application domain is a single standalone application or a HyperServer cluster which is connected to the same dedicated WebSockets server. If it is a HyperServer cluster then the whole cluster including all Nodes and slave ServerNodes are considered as a single application domain. For standalone applications this parameter is configured by setting the AppDomain property in the ServerModule.WebSocketServer class. In a HyperServer cluster it should be set in the related CFG file of the HyperServer (master HyperServer if it is a server farm).
Example CFG snippet:
This string is used to make sure only privileged parties have access to our dedicated WebSockets server. Message requests which don't provide a valid token will be rejected by the dedicated server. So any application which wants to send message requests to the dedicated server should know the correct token in advance.
GlobalBinding
We also need to assign a value to the GlobalBinding parameter. This parameter determines the domain to which your dedicated WebSockets server is visible to the global web. Most of the time it can be the same as the ExternalServerUrl parameter unless you want to use different settings for these parameters.
For instance, consider a scenario where both dedicated server and your application run in the same physical PC. In this case you may want to use a local URL for ExternalServerUrl while GlobalBinding should always contain a global domain. Considering our test case, since our test application uses a non-secure connection we should use socket.fmsoft.net:8077 for the GlobalBinding property. Please note that GlobalBinding property doesn't start with http or https because WebSockets protocol uses ws and wss instead and the proper prefix will be determined by the framework at runtime.
Our final settings for WebSocketServer looks like this:
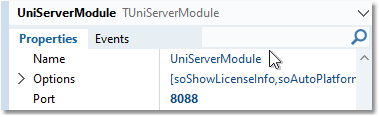
Port
Since our dedicated server runs on the default 8077 port we need to choose a different port for our test application. We will use 8088 as our application port.
Configure the test application
Set ExternalServerUrl to the dedicated server URL (e.g. http://localhost:8077).
Set ExternalServerToken to the token value used by the dedicated server.
Optionally set AppDomain only if you need separate application domains.
Set GlobalBinding to the global domain (e.g. socket.fmsoft.net:8077).
Choose an application port different from the dedicated server (e.g. 8088).
Running the application
We have already set up our dedicated server in the previous section and it is running in the background. (See: https://unigui.com/doc/online_help/setting-up-the-dedicated-webso.htm)
Now we can compile and run our test application.
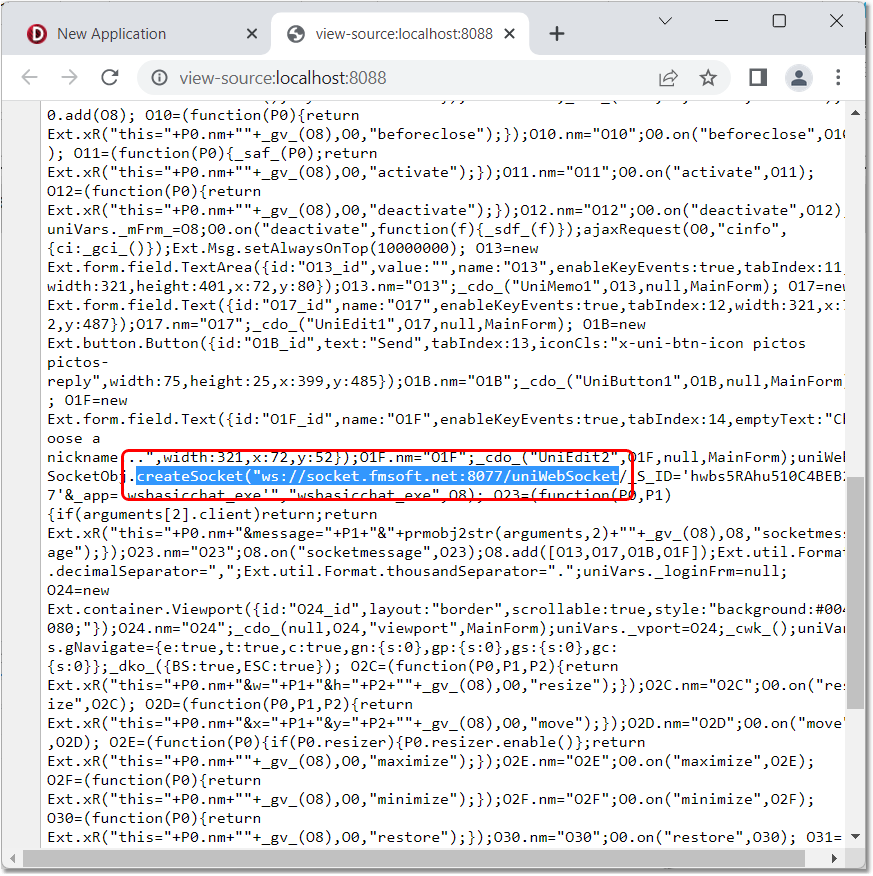
In the picture below our application is running on port 8888 and the browser console shows that a WebSocket connection is successfully established.
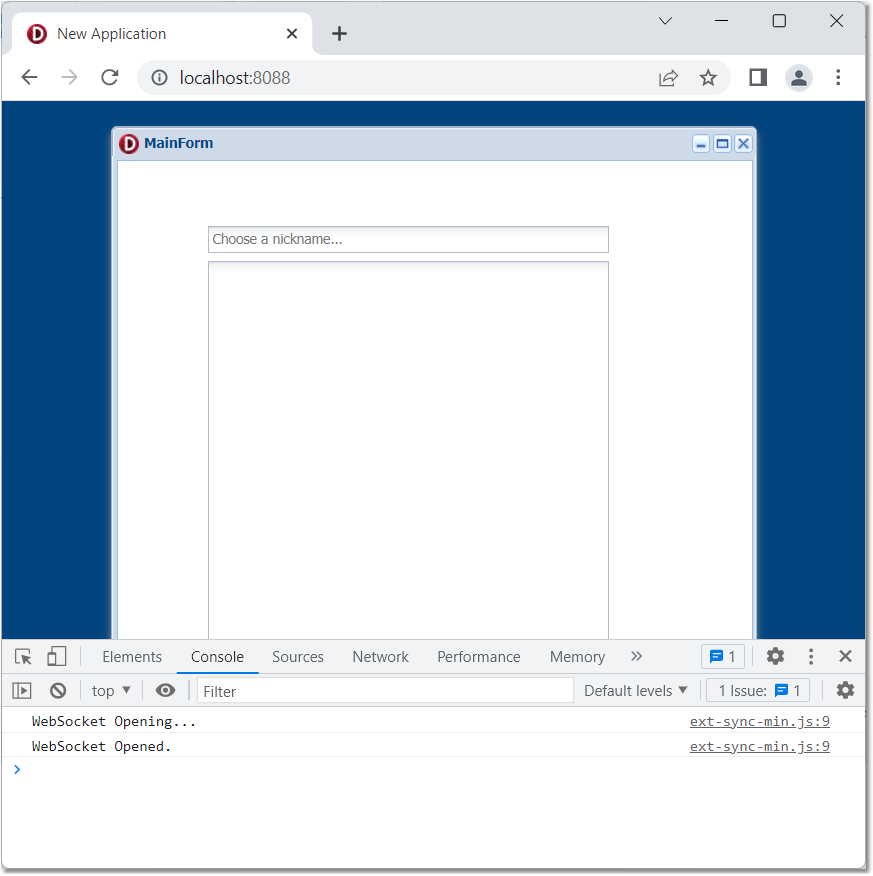
The web page source code also shows that our WebSocket connection is established to ws://socket.fmsoft.net:8077 as expected.
Finally, testing our application reveals that it is working properly.