
Installing and Configuring HyperServer
Installing and Configuring HyperServer
Installing and configuring HyperServer is straightforward. The uniGUI installer distributes HyperServer pre-compiled binaries under ..\uniGUI\HyperServer\bin\ (use \bin64\ for 64-bit binaries).
This folder contains separate binaries for available deployment methods: ISAPI DLL, Standalone Server and Windows Service:

These files are generic HyperServer server binaries and can be configured to run any uniGUI application. To deploy HyperServer, copy the appropriate HyperServer binary file to your uniGUI application folder. You may rename the HyperServer binary — required when running more than one instance on different ports. For DLL mode you may rename hyper_server.dll to match your application name.
HyperServer requires a configuration file with extension .CFG that must exist in the same folder as the HyperServer binary. If missing, one will be created automatically. Default configuration files are also available under the same folder.
First step is to copy the proper binary based on your deployment method:
Standalone server: hyper_server.exe
ISAPI DLL: hyper_server.dll
Windows Service: hyper_service.exe
Next step is to copy hyper_server.cfg to your application folder and open it with a text editor to make proper changes.
Express Configuration and Testing HyperServer
To quickly test HyperServer functionality, perform an express configuration with minimal parameters in the configuration file.

Test remote deployment
Make a small visual change in your project and re-compile.
In HyperServer control panel choose the Upload icon.

Select your newly compiled executable (myapp.exe) and press Upload.
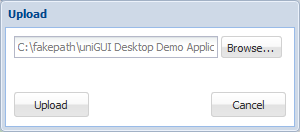
Complete the upload and confirm the next dialog.
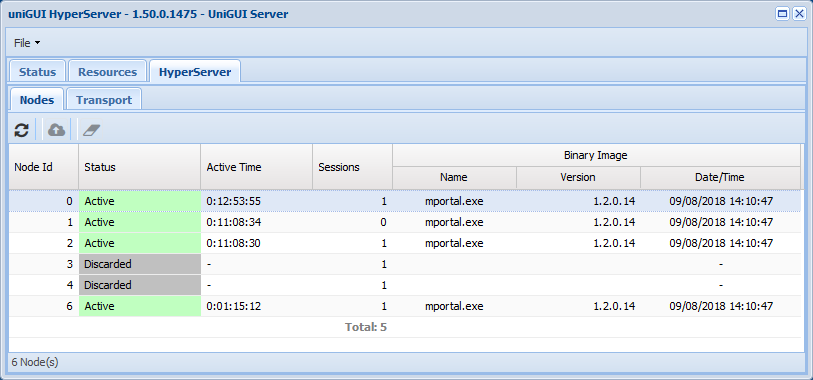
You will notice existing Nodes marked as Discarded. ![]()
Start a new session in a new browser tab — you should see the new version of your application while older versions continue running in other tabs. This demonstrates remote deployment functionality.
Detailed Configuration
After testing your application with HyperServer, review and familiarize yourself with the parameters in the HyperServer configuration file.
HyperServer Configuration Parameters
Below are the major sections and parameters found in HyperServer CFG files. Many can be left at defaults.
[transport]
pool_size=0 Maximum size for the transport handle pool. When 0, HyperServer tries to calculate an optimum value. Default = 0
command_timeout=20000 Time (ms) HyperServer waits for a response from a Node after sending a command. Default = 20000 (20s)
request_timeout=300000 Time (ms) HyperServer will wait for a Node to complete a request. Must be greater than Nodes' AjaxTimeout. Default = 300000 (5 minutes)
Note: If you set this close to AjaxTimeout, add at least 10000 (10s) as safety. (AjaxTimeout + 10,000)
connect_timeout=20000 Time (ms) to establish a connection with a Node. Default = 20000 (20s)
transport_type=0 Transport channel type for communicating with HyperServer Nodes:
0 = HTTP transport (Windows & Linux)
1 = Named Pipe transport (Windows only)
In a HyperServer server farm, HTTP transport is used between ServerNodes regardless of this setting.
start_port=16384 Used with HTTP transport (transport_type=0). HyperServer assigns transport TCP ports to Nodes starting from this value (Node #0 -> start_port, Node #1 -> start_port+1, ...). Default = 16384
Note: Make sure these ports don't conflict with OS dynamic port range. You can view Windows dynamic port range with: C:>netsh int ipv4 show dynamicport tcp
If running multiple HyperServer instances on the same host, calculate non-conflicting start_port values with: <start_port for new instance> = <start_port of previous instance> + (<max_nodes of previous instance> × 3) + 8
Example: For instances with max_nodes 8, 16, 16 and first instance start_port 16384:
2nd: 16384 + (8×3 + 8) = 16416
3rd: 16416 + (16×3 + 8) = 16472
Note: start_port is also used to create unique names for named pipe channels.
[hyper_server]
binary_name= Name of the Node executable (your uniGUI app compiled in Standalone Server mode). Only filename and extension (e.g., accounting_app.exe). File must be in the same folder as HyperServer.
initial_nodes=2 Number of Nodes initially created at startup. HyperServer maintains this minimum number in standby. Default = 2
max_nodes=8 Maximum number of Active Nodes. Note total Nodes can exceed this temporarily (e.g., during purge/discard). Default = 8
Limits:
Builds prior to 1608: up to 128
Builds 1608 and later: up to 2024
max_sessions=0 Intended top limit for total sessions. HyperServer divides max_sessions by max_nodes to set MaxSessions on each Node. This doesn't strictly guarantee the global session count. Default = 0 (no limit set)
sessions_per_nodes=0 (Not implemented)
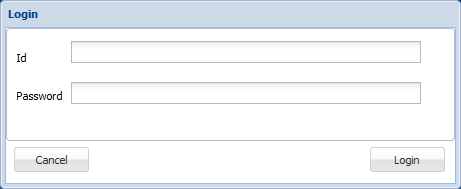
prompt_login=1 When 1, the server monitor prompts for user ID and password. Recommended in production. You can create up to 10 user accounts in [login-x] sections. Set to 0 for development/testing to avoid prompts.
Server Monitor Login Screen:
HyperServer Control Panel in Server Monitor:
persistent_node=0 Set to 1 if your application needs a persistent Node (see Terminology).
port=8077 Applies to Standalone Server and Windows Service modes. Assign a different port for each instance on the same computer. No effect for ISAPI Module.
bindings= Bind the server to specific IP addresses (Standalone/Service modes). Multiple IPs separated by commas. Default blank = bind to all addresses. Example: 127.0.0.1, 82.178.12.1
url_path=
url_referer=
ext_root=[ext]\
uni_mobile_root=[unim]\
uni_root=[uni]\
uni_packages_root=[unipack]\
Above parameters map directly to ServerModule properties (ExtRoot, UniRoot, etc.). Use these to customize runtime paths.
Example: ext_root=C:\uniserver\extjs[ext]\ (See Adjusting Paths for more details.)
framework_files_root= Equivalent to UniServerModule.FrameworkFilesRoot. On Windows, installers set this; on Linux you must set it. Example: framework_files_root=/etc/fmsoft/unigui/unigui_runtime
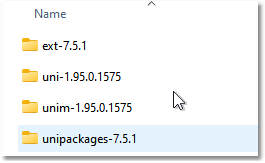
Example Windows runtime folder layout:
max_connections=500 (Standalone and Service modes only) Maximum concurrent connections. Default = 500. Should be >= max_requests.
http_max_pool=500 (Standalone and Service modes only) Size of HTTP connection pool for reuse. Default = 500. Increasing consumes more resources.
max_requests=500 Maximum concurrent requests that HyperServer will process. Excess requests are queued. Default = 500.
dont_create_backup=0 When 1, prevents creating backups when a new Node binary is uploaded. Default = 0 (create backups)
files_folder=files\ Maps to ServerModule.FileFolder. uniGUI creates URLs starting with files/ and translates to this physical folder. Recommended to leave as default; organize files in subfolders if needed.
antiflood_per_ip=0 Anti-flood mechanism at HyperServer level, works like ServerModule.ServerLimits.AntiFloodPerIP. Unit is milliseconds. 0 disables. Non-zero values require a minimum time interval between session creations from the same IP.
Example: 1000 means an IP must wait 1 second between session creations. Typical values: 250–1000. Note that multiple LAN clients may share an external IP; consider this when setting the value.
Important: This may conflict with the uniGUI stress test tool which creates many sessions from the same IP — disable antiflood_per_ip (set to 0) when running stress tests.
Default = 0
session_one_per_ip=0 When 1, restricts to one session per IP (similar to SessionRestrict srOnePerIP). May conflict with stress test tool. Default = 0 (disabled)
detailed_log=0 Enables additional logging details useful for tracking Node lifecycle and activity.
server_title= Custom title shown in server control panel and tray icon.
token=ixkdfjdjfd5115048252 Randomly generated string used for unique names (e.g., named pipes) and farm communication. If you manually edit it, ensure uniqueness among instances. When copying CFG files between instances, delete this parameter so HyperServer assigns a unique token automatically.
[node_recycling]
enabled=1 Enables node recycling.
recycle_after_idle_seconds=0 Idle time (seconds) before a Node is recycled. 0 disables. Example: 600 = recycle after 10 minutes of inactivity. The value should always be higher than the Node's SessionTimeout to avoid recycling Nodes that still have active sessions. Avoid extending session lifetime via MainModule.OnSessionTimeout (it can confuse HyperServer).
recycle_when_empty=1 When enabled, Node is recycled when it becomes empty (last session destroyed). Default = 1
recycle_after_secs=3600 Leave at default.
recycle_after_sessions=0 Leave at default.
allow_remote_config=1 Enables changing HyperServer parameters from the server control panel (gear icon). Enabled by default.
Gear icon opens a form to change various settings:
 Settings form example:
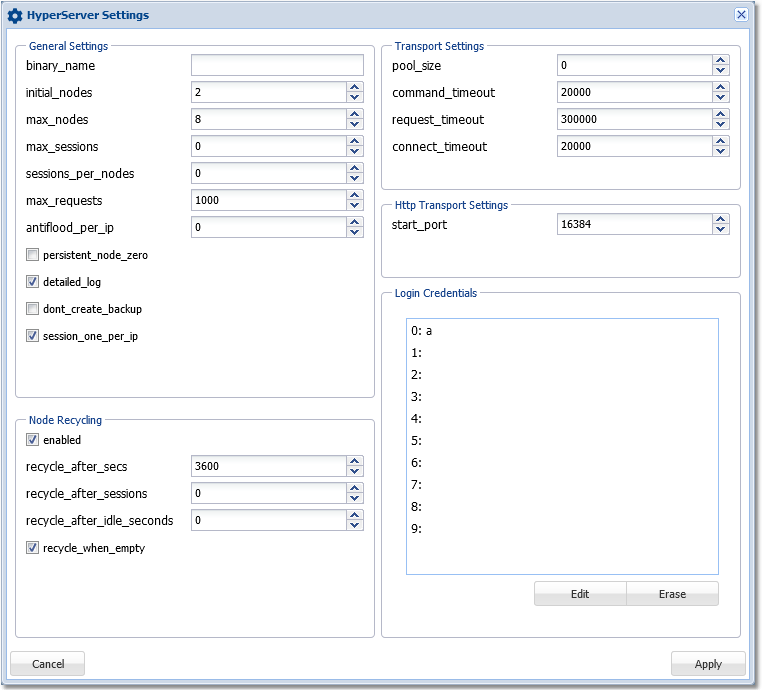
Warning: Changing parameters to invalid values can cause HyperServer malfunction. Disable remote config by setting allow_remote_config=0 in the CFG file if you want to prevent remote edits.
[login-0] ... [login-9]
You can create up to 10 user accounts to log into the server monitor (effective only when prompt_login=1). Each section has:
user_name=
password=
admin=0
admin=0 — monitor access only admin=1 — administrative rights
[custom_mimes]
Add custom MIME types to allow transferring additional file types. By default only safe file types are allowed. Add entries like:
mime_0_ext= mime_0_type= mime_1_ext= mime_1_type= ...
Example to enable 7z files:
mime_0_ext=7z mime_0_type=application/x-7z-compressed
Notes and Warnings
Be cautious when editing values related to ports, timeouts, and recycling. Incorrect values may cause malfunction or session loss.
Always ensure request_timeout is larger than Nodes' AjaxTimeout (add at least 10 seconds).
For production, enable prompt_login and configure accounts under [login-x].
When deploying multiple HyperServer instances on the same machine, plan start_port and max_nodes carefully to avoid port conflicts.
(End of imported content)
Atualizado